Sunday, September 22, 2013

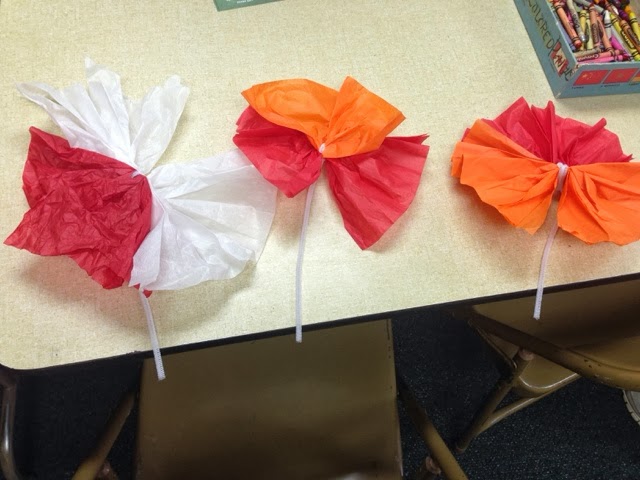
Tissue Paper Flowers

Tissue Paper Flowers 

Materials:
• tissue paper 
• pipe cleaners 

What I Did:
Fold two pieces of tissue paper like a fan (opposite directions each time you fold), put them together, on top of each other, and the twist the pipe cleaner around the middle of them both. Fan the tissue paper out on each side and you have a flower. You can even spray the flowers with good smelling perfume or scent spray! 

Sunday, September 8, 2013

Origami Flowers

Origami Flowers

Materials:
• construction paper (standard size)

What I Did:
You could use any origami object of your choice. I just happened to know how to make flowers easily. Be very thorough and direct with everything you say. And add details. Children need details to understand better. Can be used at any time of the year! 


Sunday, September 1, 2013

Finger Painting the World

Finger Painting the World 

Materials:
• Washable or water-based paint
• Poster board or large paper 
• Aprons or garbage bags to put over students while painting 
• Paper plates or something to hold paint in while they paint 

What I Did:
This project took three weeks. I required the children to wear garbage bags so they did not get paint all over their Sunday  clothes. I first drew the outlines of the world and the different countries I wanted to be shown. Then I assigned them different colors per student. They had the same color every week we worked on this project, and they knew if they were to paint the ocean or the land (blues for ocean and greens and browns for land). At the end, I had everyone paint thumb prints on the outside of the world and write their names next to it. Also, I only had them use their thumbs, so it had a more effective look. I think it went well! Supervise all of the time!! 


Letters to Our Future Selves

Letters to Our Future Selves


Materials:
• Paper
• Envelopes
• Writing utensils 

What I Did:
I passed out paper and writing utensils and helped the children out with what they should write down in a letter that will be given to them once they graduate from my class. I included things such as "2 most recent things God has done in your life" and "What you want to be when you grow up". I also had them write on the outside of the envelope their name and what grade they are in now so I know how to differentiate them from each other in different grades. I will give it back once they graduate from the class and they will see (maybe!) how different their life and opinions are now. 


Daniel and the Lions' Den

Daniel and the Lions' Den

Materials:
• Cupcake papers/holders
• Markers
• Construction paper
• Glue

What I Did:

I wrote "Daniel in the lions' den" at the top and "God sent an angel to shut the lions' mouths." at the bottom of the page. Then I drew a stick figure of Daniel (and you can also draw the angel since the angel was addressed) and then I drew lion faces inside of the cupcake papers and glued them down to the paper with Elmer's glue. Simple and fast!


Sunday, July 14, 2013

Ways to Stop Unfriendly Teasing

Materials:

  • Paper
  • Anything to write/color with (pencil and markers, crayons, colored pencils, etc).
  • Dry Erase board/chalk board (totally optional)**

What I Did:

This is super easy to do last minute. 
I passed out paper to each of the kids and told them to draw their hand with a pencil on the paper, and draw a little bit of an arm for later (in case we have extra ideas). Then I drew on a dry erase board so that all of the students could see. I drew my own hand and arm and I wrote 1, 2, 3, 4, and 5 on each of my fingers, circled. Then I asked the class what they think are some good ways they think to handle a situation they are in if they are being teased or are being treated badly while at school. As we wrote down the ideas, I had them write them down on their sheets too. I had them draw a little bit of arm in case anyone else throws something out and you have already reached five total. Then just start numbering them off down the arm.
At the end, if extra time allows, color the papers. Coloring always takes up time. :)

Locks Game

Materials:

  • Small locks (about 8-10)
  • Keys that match every lock
  • Paper to write verses on
  • Something to contain all of the above supplies

What I Did:

I bought the cheapest, smallest locks I could find at Big Lots ($2 per lock) and wrote down easy-to-memorize verses on them, and put where in the Bible they are found on the keys (or the other way around, as shown in the picture below). I placed them in the middle of a circle of children and told them to go for it. 
You could easily reuse these keys and locks again for other purposes, maybe books of the Bible or stories in the Bible, etc. Any category that you can pair with something else works great. 

Saturday, June 29, 2013

TP Bald Eagles

TP Bald Eagles                                                                4th of July

Materials:

  • Toilet paper rolls
  • Printer/paper
  • Glue
  • Scissors
  • Something to color with

What I Did:

First I made sure I had enough TP paper rolls and I printed off enough templates for the students. The website I printed them off from is http://www.dltk-kids.com/animals/mbaldeagle.htm. I colored every unattached piece first and then taped the body to the roll. Then I glued every other piece on that was already colored. The dotted lines are to be folded under. Here is a picture example:
The tail on the back is glued to the body so as not to flap on and off. The feet are folded under the roll on the dotted line and glued inside of the roll.

Saturday, June 22, 2013

Father's Day Bottles of Love

Father's Day: Bottles of Love                                    Father's Day

Materials: 

  • Plenty of Reese's Pieces
  • A container that has a lid on it (i.e., bottle)
  • Tags
  • Paper (copy paper or scrapbook paper, your choice)
  • Tape and/or glue
  • Crayons/markers/colored pencils

What I Did:

I went to Hobby Lobby and bought small sand bottles (99 cents a piece!) and a few pieces of scrapbook paper for the paper that goes around the bottle and cheap tags you can write on to put around the opening of the top of the bottle. I got 4 bags of Reese's Pieces at Walmart.
I had the students write "Happy Father's Day!" on cut out pieces of scrapbook paper and tape that around the bottle, then fill the bottle up with Reese's Pieces. Then I had them write on the tags "I love you to pieces" and tie that around the opening, screwing the lid on afterwards.
After that, I had them write personalized cards to go with their gifts to their fathers. 
And then we all enjoyed some leftover Reese's Pieces! :) 


Saturday, June 1, 2013

Jonah in the Big Fish

Jonah in the Big Fish                                                             Anytime

Materials:

  • Paper
  • Colored pencils/markers/crayons
  • Elmer's glue
  • Googly eyes (optional; can just draw and glue eyes if preferable)
  • See-through cups/balloons
What I Did:

I personally drew Jonah and the fin on pieces of paper for the students to cut out so that it would be cost-effective and easier. They can color the paper if they would like or you could buy colored paper to paste. I used Elmer's glue on the googly eyes on the side of the cup and then used Elmer's glue on Jonah on the inside of the cup and on the fin on the bottom of the cup. Then laid them out to dry. 

*Side note: I used cups instead of balloons because I was worried about hearing them pop in the middle of the service after Sunday School. ;) 


Saturday, May 25, 2013

Letters to Moore Public Schools- Tornado Victims


Letters to Moore Public Schools- Tornado Victims


Materials:

  • Paper
  • Crayons/markers/colored pencils
  • Envelopes and stamps
What I Did:

I prepared things for the kids to put in the letters in case they needed help, which consisted of:
  • Nicoma Park is praying for you
  • Our prayers are with you -from First Baptist Church of Nicoma Park
  • Moore is in our prayers -from First Baptist Church of Nicoma Park
  • Praying for your strength and peace
  • We love you -from First Baptist Church of Nicoma Park
  • You are not alone
  • You are in our thoughts and prayers -from First Baptist Church of Nicoma Park
  • Psalms 121:1, 2 -I lift up my eyes to the hills, where does my help come from? My help comes from the LORD, the Maker of heaven and earth.
  • Galatians 6:2 -Carry each other's burdens, and in this way you will fulfill the law of Christ
Make sure you read all of the letters and make sure they're appropriate before sealing the envelopes.
* This project can work for any group that has had an unfortunate disaster occur near their hometown or in their state or country. We would like to help in any way we can and prayer is the best way to help for our 3rd and 4th grade students. Make sure you explain to them that this is a serious matter and they need to be mature about it because there are people without homes and the lifestyle that they themselves have right now. Prayer and assurance are what they need right now.

Sunday, May 12, 2013

Prayer Pails

Prayer Pails                                                                                    Anytime of the year


Materials:
  • Popsicle sticks
  • Small pail/cup
  • Any kind of writing utensil (*colorful markers are probably preferred)
What I Did:
I wrote down 10 specific things/people on 10 popsicle sticks that I would like to pray for anytime that I sit down to pray. My list (for example-use) is as follows:
  1. Mom and Dad
  2. Meme and finances/health (grandmother)
  3. Bro. Mark and Stuart and their families (preacher and youth pastor)
  4. Friends: health and decisions
  5. That I will make good decisions
  6. School: teachers and authority
  7. The Earys and the CHS Band (work/boss)
  8. Cousins (brothers/sisters)
  9. Thank God for my salvation
  10. Thank God for my friends and family
It does not have to be completely things that you need help with. I included things I would like to thank God for that are in my life, because those things should also always be included in one's prayer. I used ten, but I recommend between 5-10 popsicle sticks be used. The more you use, the more creative the kids can get. And don't let them use just generic answers such as "parents" or "preacher"; tell them to get specific with their lives! Things they would actually ask God about themselves. They don't have to share it with anyone if they do not want to.You could even ask before you start on the project for some examples that could be written on the sticks and maybe get some interesting answers! Tell them they can take these out anytime they sit down to pray (when they wake up, before eating, before going to bed, etc.) It's a fun way to remember what you want to pray for!


Mother's Day Cards/Flowers

Mother's Day Cards/Flowers                                                           Mother's Day!

Materials:
  • Crayons/markers
  • Paper (already printed/copied for the children)
  • Optional: Flowers that were previously grown/made/planted in Sunday School from the "Flowers in Flower Pots" Sunday School long-term activity
What I Did:
This is a super simple activity to do in Sunday School, with just about any elementary-age group. I just printed out a card that I found on Google Images, but I wanted it to be some type of plant/flowers card because we had been growing flowers that they would be able to take home to their mothers for the holiday. The inside of the cards are blank white paper, so that the children can put whatever they would like to say or draw in it for their mothers. They loved it! Especially the planting part. :)

Saturday, May 4, 2013

Note-Taking in Worship Long-term Project

Note-Taking in Worship         Anytime of the year- longterm project

Materials:
  • Small notebook
  • Writing utensil 
What I did:
This project is intended to last for as long as the student is in the class, and if they choose, afterwards.
In order to expand on note-taking skills and getting more out of the message on Sunday mornings, I have decided to start this fun, little project. 
I have written on the inside flaps of the notebook what my expectations are and what they are to do.

The front inside says "You may write whatever you feel you are led to write. This is an aid to help you in your note-taking. At the end of every month, you will turn these in to me and if you have filled it out for every day that you have been to church this month, you will receive a prize."

The back inside tells what the acronym, SOAP, means and entails:
SOAP
S: Scripture verses
O: Observations (the bullet points shown on the screen)
A: Application to your own life (what the preacher says that applies to your life or something you can work on in your own life that relates to the message)
P: Prayer of response (a prayer that is your own personal prayer that reflects the message that has been given)

If they do not want to go with what the acronym says because maybe it is too much for them, let them write whatever they want about the message. But when I check them, I want to be able to tell that they got something out of the message that applies to them and their life. I want to make sure that they learned something that morning. That is the intention of taking notes in church and I want them to understand that. I started taking notes in service when I was very young and I still do. I used to because it kept me from not being able to sit still and it helped me pay attention. I think that this will do a lot of good for my students and maybe teach them more just by writing down and listening to the preacher. 


Creative Creation: Decorating the Days of Creation

Creative Creation: Decorating the Days of Creation Anytime of the year


Materials:

  • paper
  • crayons/colored pencils/marker
What I did:
This is a very, very simple project for if you didn't really have time to think of something and it is last minute, or if you are a broke teacher and need something cheap to work with, both of which I have been in that situation. 
I simply blew up numbers on separate pieces of paper and made copies like crazy of each one, stapling them together, and then decorated/colored the days of creation on the corresponding numbers. For example, for the first day, God created light and darkness, so in the top corner of the paper I drew a sun and in the bottom corner I drew a moon. On the second day, God created the sky and the sea, so I drew water and clouds (hold up on the birds and fish, they come in later.) I also drew the words "light and darkness" or the corresponding words on the correct days of creation, just so my children understand what was created on that day and so that they knew what to draw, but that part is completely optional.

Sunday, April 28, 2013

Cross-Beaded Necklaces

Cross-Beaded Necklaces                                                     Anytime


Materials: 
  • Cross-shaped beads (found at Hobby Lobby) 
  • A large tub of assorted beads 
  • Cord or string 
What I Did:
This is a very simple, and sometimes last-minute, craft you can do anytime of the year and the kids understand how it is supposed to work. All you need to do is tie a knot at one of the ends of the string so the beads don't fall off as you place them on. Then start the beading process. Let the kids use their imaginations. Some will make patterns and some will do random assortments. Make sure you make the necklaces loose enough they can easily take them off over their heads. The teacher should probably be the one to tie them so that the child doesn't make it too tight on accident. 


Friday, April 12, 2013

Flowers in Flower Pots

Flowers in Flower Pots                                                    Springtime

Materials:

  • Flower pots
  • Seeds (different kinds for more creativity)
  • A safe place to put them for a few weeks
  • Water
  • Potting soil

What I Did:

This will be a long term project.

It's pretty simple. Put the potting soil in the flower pots, burying the seeds before covering the top of the seeds with the rest of the soil. Water the seeds, then put the flower pots in a windowsill that will get plenty of sunshine throughout the week. Continually water once or twice a week (be sure to buy the type of flowers/plants that don't require daily watering!)

Tissue Paper Trees

Tissue Paper Trees                                                           Springtime

Materials:

  • Assorted colors of tissue paper
  • Copy paper
  • Markers
  • Elmer's glue (*recommended) or glue sticks

What I Did:

Crinkle some little pieces of tissue paper (always switching between colors) and gluing them on a paper that I had already drawn a tree trunk and branches on with markers. Simple and takes up time. They can draw all over the paper and draw a picture around the tree as well.

"You Were Bought at a Price..."

"You Were Bought at a Price..."                                           Easter

Materials:

  • LOTS of pennies
  • Large-sized popsicle sticks
  • Hot glue gun/sticks
  • Marker/sharpie (for verse on back)

What I Did:

WARNING: This craft takes up a lot of time! Make sure you have enough!

Before presenting the class with instructions, I had personally taken two popsicle sticks and wrote "1 Corinthians 6:20a" on one and "You were bought at a price..." on the other, then glued them together (so you could legibly read the verse). 
During class, it took up so much time, that I pulled kids during lesson time. Having 2 teachers work with 2 glue guns/children at one time is best. 
I used the glue gun the entire time and had the child pick out one penny at a time and place it on top of the glob of glue. **Explain to be careful and follow instructions or the child will get burned. Use lots of glue or they'll all pop off if dropped.

Jelly Bean Prayer


Jelly Bean Prayer                                              Week before Easter


Materials:

  • Jelly Beans
    • Red
    • Green 
    • Yellow
    • Orange
    • Black
    • White
    • Purple 
    • Pink 
      • Make sure to buy a bag or bags with colors such as black and white or purple and pink!
  • Snack-size sandwich bags (to put jelly beans and prayer poem in)
  • Paper to print prayer off on

Prayer Poem:

  • Red is for the blood He gave
  • Green is for the grass He made
  • Yellow is for the sun so bright
  • Orange is for the edge of night
  • Black is for the sin we made
  • White is for the grace He gave
  • Purple is for the hour of sorrow
  • Pink is for our new tomorrow

What I Did:

I printed out the poem and cut them into rectangles long enough to fit into the sandwich bags. I made the colors in the poem blank lines for the children to fill in (to take up some time; not necessary). They may need help with where purple and pink go because they are a little vague, but if you tell them the answer, explain why purple is sorrow and pink is the new tomorrow. 
After they filled in the blanks, I dumped a bag of jelly beans into a shoe box (any kind of box or bowl would work as well) and had the children find the colors in order and place the beans into their bags. Then we discussed what each jelly bean represented, so they might be able to tell the story of Easter to someone else using just jelly beans. Don't let them eat the jelly beans!